Image Map
Image Map
Showing posts with label DIY. Show all posts

Tuesday, July 31, 2012

DIY Scrabble Tile Art


I've been whipping these up for all kinds of occasions lately. It all started with my brothers wedding back in May when I wanted to create a beautiful handmade gift but was on an uncomfortably tight budget. If you're lucky enough to come across an old game of scrabble at a local thrift store or collecting dust in a friends basement this entire project will cost only a few dollars. I recently put another one together for my master bedroom in time for our recent anniversary. Hubby loved it.

After you've tracked down an old game of scrabble round up the letters you'll need and play around with combinations. Find a frame big enough to display your words of choice, we found ours for $1 at our local dollar store. We kept it clean by inserting a plain sheet of white paper inside the frame but you can add in some patterned paper to spice things up a bit. Once you have your tiles laid out the way you would like use hot glue to attach them directly to the glass. The hot glue comes off super easy if you make a mistake and need to do any adjustments. We flipped over one of the tiles and added on a sparrow cabochon just for fun. 

We have another special project in mind for our old scrabble board...but we'll need to collect a few more first. 

We've linked up this post to the All Things Pretty Linky Party!! Come on by and check out the beautiful creations other talented bloggers are sharing. 

All Things Pretty Linky Party


Monday, July 9, 2012

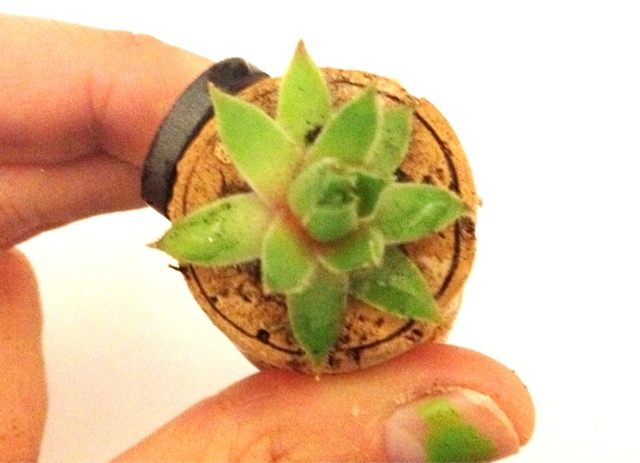
DIY Wine Cork Succulent Planter Magnets


Adorbs right??? These sweet wine cork succulent planter magnets (wow-that's a mouthful) are oh so simple to make and are undeniably darling. I made up our batch in less than 10 minutes with some reserved wine corks, succulent trimmings and common crafty bits. Who doesn't have a secret stockpile of wine corks somewhere since Pinterest made it's debut?? Here's how we did it!! Please excuse my disgruntled manicure.


Hollow the centers of your wine corks with a paring knife or an extra large drill bit. In the time it took me to carve out the center of one cork with a paring knife my hubby hollowed out two with his drill.

Adhere magnet rounds to the side of the cork using a hot glue gun. We found our magnet rounds at a local dollar store.

Place a little soil in the hollow of the cork and carefully insert your succulent trimming. Add a little more soil around the edges and gently press down the soil to secure the plant. Water with an eye dropper. You can also dip the tip of your succulent in rooting hormone before planting to give it a better chance to take root in it's new home. Rooting hormone can be found at any nursery.


LOVELY!! Wouldn't these made a neat little housewarming gift?? Hand crafted presents are my favorite.

Wednesday, February 8, 2012

DIY Bottle Necklaces


I was elated today to have had the pleasure of being featured on one of my favorite blogs, IntheClotheset. I created the perfect diy for a girls night in - custom bottle pendants reminiscent of everything that makes you unique. Please click on over for the complete tutorial and don't forget to say hello to undeniable ItMom Jenina.

Tuesday, February 7, 2012

DIY Natural Boho Necklace

We shared THIS post with you a few days ago showing off the fun, simple accessories we created for my daugther to add a little flair to an inexpensive ensemble. One of my favorite parts of her colorful get-up was the little boho necklace I whipped up in minutes from goodies found around my home. Here's how you can make something similar to add some natural whimsy to your look.

What You'll Need
  • Suede Cord (even Walmart carries these)
  • End caps, jump rings, lobster clasp (score these goodies at your local craft store)
  • Jewelry Pliers
  • A skewer or drill outfitted with a very small bit
  • A small piece of bark (search your yard or even your potpourri bowl!!)
  • A vintage bead scavenged from a broken necklace

How-To

1. Using the skewer or drill make a small hole in the top of your piece of bark.


2. Thread your suede cord through the hole with a large needle. Be careful...bark will crack under pressure.


3. Add your reclaimed or newly purchased bead to your necklace by stringing onto the suede cord. Once it's on there tie a loose knot with the suede cord over the bark securing the whole thing on there.

4. Secure end caps onto each end of suede cord with jewelery pliers.


5. Add jump rings and lobster claps to the end of each end cap with pliers as shown below.


There you have it!! A simple statement necklace in just a matter of minutes!!

Monday, January 30, 2012

DIY Pink Mustache Onesie (or tee, or tote..or whatever)


I've been itching to make my little gal a fun, whimsical onesie that really shows off her silly side. What's better than a bright pink mustache?? This was super simple to make once I had designed the graphic. This project will be even easier for you to whip up at home because I'm providing you with the graphic to download, free of charge!!

What You'll Need
Our free, printable graphic - available for download below
Access to a printer
Avery Iron on T-Shirt Transfers
Scissors
A hot iron
A clean, fresh white onesie (or try this design on a tee for older kids...or even a canvas tote bag)


Pink Mustache


How-To

1. Following the manufacturers instructions print our pink mustache graphic onto the t-shirt transfer paper. Cut the image out as close to the edges of the design as you can muster.

2. Make sure your iron is on the highest setting and is nice and hot. Provide a smooth surface to apply your graphic. Smooth out the surface of your onesie with your hands ensuring there are no wrinkles or folds.

3. Following the manufacturers directions use your iron to apply the graphic. Keep your iron moving - the last thing you want is to burn your application surface. Slowly and carefully remove the backing of the t-shirt transfer paper. If you see any pieces that didn't transfer place the paper back down and apply some more heat.

Tadda!! A whimsical custom onesie that your little one is sure to rock out like a pro. Expect lots of oohhs, awws and giggles from random strangers.


Wednesday, December 21, 2011

A 5 Minute Holiday Headband


Have a few minutes?? Then why not whip up this fun and easy headband that is sure to add a little sparkle to your little ones wardrobe this winter.

What You'll Need -
  • Hot glue gun
  • Headband Blank (can be found at most craft and dollar stores)
  • 1 blue ostrich feather and 4 white saddle feathers (my fave place to buy feathers is HERE.)
  • A snowflake or winter embellishment (we found ours in the scrapbooking aisle)


How-To

1. Slowly and carefully using the hot glue adhere the blue ostrich feather to the headband blank as shown below.


2. Starting in the bottom center of the ostrich feather, begin gluing your white saddle feathers. Layer the feathers one at a time creating a fuller look.


3. Glue your winter embellishment to the base of the feathers. We added a sparkly gem to the center of our snowflake to make it pop. We found a package of a dozen of these gems for only $1 at our local dollar store.


Tadda!! Instant holiday glam!!

Tuesday, October 11, 2011

A Fairy Hideaway


Our daughter has quite the fascination with all things fairy-like lately. We love to see her smile so we have been working hard at transforming her bedroom into a space a garden fairy would be proud to call home. An empty corner in our little gals bedroom was practically begging for a little something special so we created this fairy net hideaway from some bits and pieces we had around the house along with some faux fleurs for under $10. It's the perfect place to curl up with a book, have a giggle and dream big dreams.

Here's How We Did It (no sewing required!!) -

What You'll Need
  • A Hula Hoop
  • 1-2 yards of tulle (depending on how the desired length)
  • Hot glue gun
  • Scissors
  • Ribbon
  • Faux Flowers (we found the best deal at our local dollar store)
How-To

1. Fold the end of the tulle over the hula hoop from the outside to the inside and using the hot glue adhere to the inside of the hula hoop. Go all the way around until the width of tulle is fully adhered to the inside of the hula hoop creating a tent. You can leave an opening at the front of the tent or adhere the tulle all the way around...it's up to you.

2. Cut small slits in the exterior of the tent every quarter of the diameter. Tie lengths of ribbon through each of the holes and around the hoop. Double knot. Bring all 4 pieces of ribbon together to form the hanging system for the tent - as seen in top photo.

3. Glue fabric flowers around the exterior edges of the hula hoop for decorative flourish.

4. Hang the fairy net from a sturdy, anchored hook. Trim any excess tulle or ribbon.


Saturday, September 3, 2011

DIY Gel Air Freshener


These homemade gel air fresheners would make a great gift and are a fabulous way to create custom, fresh scents for around your home. Try experimenting with different essential oils to create the ambiance you are looking for in every room of your house.

What You'll Need
  • A clean empty jar, we used a regular sized baby food jar. This recipe is JUST the right amount to fill a jar of this size.
  • 1 tsp. of essential oil in scent of your choice (our fave place to shop for essential oils is Canwax.
  • Food coloring, in color of choice
  • 2 pouches of unflavored gelatin
  • 1/2 cup boiling water
  • 1/2 cup very cold water
How-To

1. In a medium sized mixing bowl add the boiling water to the gelatin powder and whisk until dissolved.

2. Whisk in essential oil and a few drops of your desired shade of food coloring. Mix in the cold water.

3. Funnel liquid into the jar and leave out at room temperature until thickened. Do NOT place the jar in the fridge.

Tadda!! Custom home fragrance created in minutes!!

*Updated Tip - I found while this air freshener smelled delightful it only has a shelf life of 1-2 weeks depending on the humidity of the room you place it in.

Tuesday, August 9, 2011

How-To: Make a Girls Stretchy Beaded Ribbon Bracelet


These shiny baubles are a top seller for my new accessories line Shine! Couture. Little girls deserve a little shine of their own and why not show it off by creating your very own stretchy beaded ribbon bracelet??

What You'll Need

  • Metallic jewelry elastic (can be found at any craft store, walmart or even dollerama)
  • 7 Large 20mm sized beads, we go wild for bright colors and multi-faceted styles
  • Satin Ribbon
  • Scissors
  • Lighter (I like using a bbq lighter to keep the flames away from my delicate fingertips!!)

How-To

1. Cut a 12 inch length of elastic and fold over to create one double 6 inch piece. This will make the bracelet stronger.

2. Thread beads onto the elastic one by one. Take 2 ends and tie together fairly tightly into a wreath knot. Triple knot for added durability. A wreath knot is also known as a reef knot or a square knot. A great step-by-step how-to on creating this style of knot can be found on Howcast.


3. Tie a bow over the elastic knot with the satin ribbon. Heat seal the ends of the bow with a lighter to create a fray-proof edge. *Tip - Don't hold the lighter TOO close...test this technique out on a piece of scrap ribbon first to get the hang of it. It's much easier than it may sound!!


There you have it!! A beautiful bracelet fit for your favorite mini fashionista.

Monday, July 18, 2011

DIY Wall Art


You know those awkward bare corners of your home that you're not quite sure what to do with?? In our home we have one of those such corners between our wall unit, media tower and staircase. It had been driving me slightly mad for months. My sister-in-law generously gifted me the frame and subway art shown above at my recent bridal shower. I wanted to add something just a little more to give that corner some extra pop. I recently found some flying sparrow wall art pieces online that caught my eye for $39.99. With a little crafty ingenuity I recreated the look with some commonly found craft supplies...for free!!

What You'll Need
  • Access to a printer and printer paper
  • Scissors
  • Black cardstock
  • Pencil or pen
  • 3d glue pop dots
How-To

1. Do a google search for the shape you are looking for. We searched for sparrow silhouette. Save the image to your computer. Copy the saved image and paste into microsoft word. Adjust the size of the image until you are satisfied. We printed 2 separate sizes for our wall art.

2. Cut out the printed silhouettes, these will be your templates. Place your templates over the cardstock (we used a textured variety) and draw around the template to recreate the shapes on the cardstock. Make as many shapes as you need.


3. Cut out each shape from the cardstock carefully. Attach a 3d glue pop dot to the back of each shape. Stick your shapes wherever you would like.


Swoon!! I loooove the finished product. Now onto another project...pregnancy hormones have me in decorating over drive!!